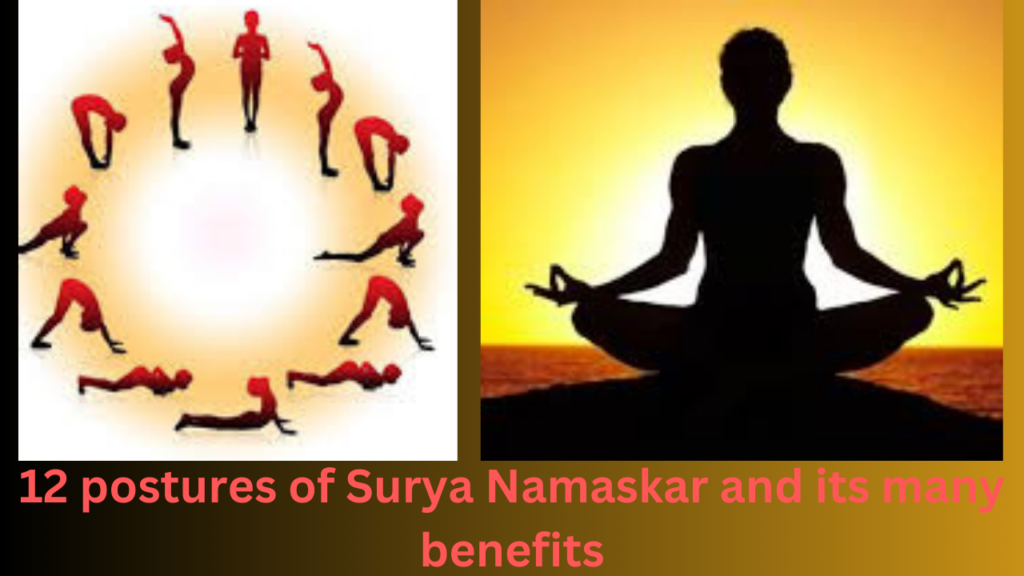
What if I told you that just 10 minutes of yoga practice a day can completely transform your body and health? Yes, it’s true, and it starts with Surya Namaskar – also known as Sun Salutation. This ancient practice rooted in yoga is more than just a workout. It’s a sequence of 12 powerful yoga postures that flow together, moving your body in sync with your breath. This timeless yoga practice dates back to ancient times in India, where it was performed to honor the sun, the source of energy and life.
History of Surya Namaskar
Began in ancient India, Surya Namaskar has been practiced for thousands of years to honor the sun (which is considered the source of life). Traditionally performed at sunrise, this sequence of 12 yoga postures is not just a physical exercise; it’s a holistic practice that connects body, mind, and spirit.
The simple sequence of yoga postures of Surya Namaskar energizes your body and calms your mind. Welcome to Surya Namaskar or Sun Salutation. Let’s explore how this ancient yoga pose can become a transformational part of your daily routine
Meaning of Surya Namaskar
The term “sun salutation” comes from Sanskrit, where “sun” means sun and “namaskar” means greeting or salutation. By doing this sequence, you are actually saluting the Sun, and acknowledging its vital role in sustaining life on Earth.
Benefits of Surya Namaskar
- The spine becomes strong and flexible, which improves posture.
- Blood circulation improves throughout the spinal and paraspinal systems.
- Musculoskeletal function of the upper and lower limbs improves.
- Heart functioning improves.
- Metabolism improves.
- A sluggish neuroendocrine system is activated.
- The immune system gets a boost.
- Digestion improves.
- Helps deal with insomnia.
- Maintains blood sugar.
- Reduces stress levels.
- Regulates hormones.
- Tones the spine, neck and arms.
Doing Surya Namaskar regularly can benefit you in the following ways: Improves blood circulation in the body, which makes the organs function better. Strengthens bones and muscles. Helps with hormonal imbalances and problems caused by it.
One set of Surya Namaskar burns about 13.9 calories. Therefore, doing 12 sets of Surya Namaskar every day can help you burn about 416 calories over time, which is a significant step towards your weight loss goals.
Practicing Surya Namaskar activates all major muscles and energizes the entire body. This means you can include it before any workout, which is a great way to stretch and warm up all your major muscles and joints.
Surya Namaskar is completed in 12 steps and each of its steps is very beneficial in itself. Surya Namaskar is done to pray to Lord Surya. Different names of Lord Surya are chanted during the entire process of Surya Namaskar. Surya Namaskar consists of 12 steps in total. All the steps of this asana should be done very carefully and no changes should be made from your side. This asana has its benefits only if done correctly.
Always practice Surya Namaskar in an open, airy place.
If you are practicing it in the morning or during the day, then do it facing the east direction.
If you are doing it in the evening, then keep your face towards the west.
Surya Namaskar should always be performed on an empty stomach.
Wear loose and comfortable clothes only.
Come from one asana to another position very smoothly and not by jerking.
While doing Surya Namaskar, we should do all the steps according to the capacity of our body.
After the completion of Surya Namaskar, do Shava-Asana for some time until the breathing becomes normal again.
Do not do Surya Namaskar if there is weakness in the body due to any long-term illness or weakness of bones. In such a situation, it is very important to consult your doctor.
If you have any disease in your spine or low back pain due to any injury or any other reason, do not do Surya Namaskar in such a situation.
Step 1: Pranamasana (Prayer Pose)
• How to Do It: Stand straight with feet together and palms pressed together in front of your chest.
• Breathing: Exhale.
• Focus: Centering yourself and preparing mentally for the sequence.
Step 2: Hastauttanasana (Raised Arms Pose)
• How to Do It: Inhale and lift your arms overhead, arching your back slightly.
• Breathing: Inhale.
• Focus: Stretching the whole body upward.
Step 3: HastaPadasana (Hand to Foot Pose)
• How to Do It: Exhale and bend forward from the hips, touching your hands to the floor beside your feet.
• Breathing: Exhale.
• Focus: Stretching the hamstrings and back.
Step 4: Ashwa Sanchalanasana (Equestrian Pose)
• How to Do It: Inhale and step your right leg back, keeping the left foot between your hands.
• Breathing: Inhale.
• Focus: Opening the hips and stretching the groin.
Step 5: Dandasana (Stick Pose)
• How to Do It: Hold your breath and step the left leg back to align your body in a straight line.
• Breathing: Hold.
• Focus: Engaging the core and strengthening the arms.
Step 6: Ashtanga Namaskara (Salute with Eight Parts or Points)
• How to Do It: Exhale and lower your knees, chest, and chin to the floor.
• Breathing: Exhale.
• Focus: Preparing to transition into the next pose.
Step 7: Bhujangasana (Cobra Pose)
• How to Do It: Inhale and slide forward, lifting your chest upward.
• Breathing: Inhale.
• Focus: Stretching the spine and opening the chest.
Step 8: Adho Mukha Svanasana
• How to Do It: Exhale and lift your hips up and back, forming an inverted V.
• Breathing: Exhale.
• Focus: Stretching the back and legs.
Step 9: Ashwa Sanchalanasana (Equestrian Pose)
• How to Do It: Inhale and bring your right foot forward between your hands.
• Breathing: Inhale.
• Focus: Repeating the stretch on the opposite side.
Step 10: HastaPadasana (Hand to Foot Pose)
• How to Do It: Exhale and bring the left foot forward, folding into a forward bend.
• Breathing: Exhale.
• Focus: Deepening the stretch in the hamstrings.
Step 11: Hastauttanasana (Raised Arms Pose)
• How to Do It: Inhale, lift your torso up, and stretch your arms overhead.
• Breathing: Inhale.
• Focus: Elongating the spine and stretching upward.
Step 12: Pranamasana (Prayer Pose)
• How to Do It: Exhale and return to the starting position with arms by your sides.
• Breathing: Exhale.
• Focus: Grounding yourself and absorbing the benefits of the sequence.
Breathing Techniques in Surya Namaskar
Breathing is crucial in Surya Namaskar:
• Inhale when opening or stretching.
• Exhale when folding or contracting.
• Maintain a smooth, rhythmic breathing pattern to enhance relaxation and focus.

Modifications and Variations
• Beginners: Start slowly, with a few rounds, and focus on the practice.
• Advanced practitioners: Increase speed and incorporate mantras for a more intense practice.
• Physical limitations: Use supports such as blocks or modify the poses to suit your needs.
Incorporating mantras adds a spiritual dimension:
1. Om Mitray Namah (Salutations to the friend of all)
2. Om Ravaye Namah (Salutations to the one who dispels darkness)
3. Om Suryaya Namah (Salutations to the one who dispels darkness)
4. Om Bhanave Namah (Salutations to the one who brings light)
5. Om Khagaye Namah (Salutations to the one who moves in the sky)
6. Om Pushne Namah (Salutations to the one who nourishes and satisfies)
7. Om Hiranyagarbhaye Namah (Salutations to the one who shines like gold)
8. Om Marichaye Namah (Salutations to the one who gives light with infinite rays)
9. Om Adityaya Namah (Salutations to the son of the cosmic divine mother Aditi)
10. Om Savitre Namah (Salutations to the one who is responsible for life)
11. Om Arkaaye Namah (Salutations to the one who is worthy of praise and glory)
12. Om Bhaskaraya Namah (Salutations to the giver of wisdom and cosmic light)
Best time to get the benefits of Surya Namaskar
However, the best time to do Surya Namaskar is sunrise. Apart from this, you can do it at any time throughout the day. Surya Namaskar is completed in a total of 12 steps and each of its steps is very beneficial in itself. Surya Namaskar Asana is to pray to Lord Sun. Different names of Lord Sun are chanted during the entire process of Surya Namaskar. There are a total of 12 steps of Surya Namaskar Asana. All the steps of this asana should be done very carefully and no changes should be made from your side. This asana has its benefits only if done correctly.
Always practice Surya Namaskar in an open, airy place.
If you are practicing it in the morning or during the day, then do it facing the east direction.
If you are doing it in the evening, then keep your face towards the west.
Surya Namaskar should always be performed on an empty stomach.
After completing Surya Namaskar, do Shava-Asana for some time until the breathing becomes normal again.
Wear loose and comfortable clothes only.
Common mistakes to avoid :
• Wrong posture: Keep your body aligned correctly to avoid injuries.
• Breath holding: Always keep the breath in sync with the movement.
• Over exertion: Listen to your body and don’t push beyond your limits.
Incorporate Surya Namaskar into your routine :
• With 10 minutes of daily practice of this asana, you can feel significant changes in your body.
• Combine exercises: Combine Surya Namaskar with meditation or other yoga exercises for overall benefits.Lorem ipsum dolor sit amet, consectetur adipiscing elit. Ut elit tellus, luctus nec ullamcorper mattis, pulvinar dapibus leo.
Surya Namaskar for different age groups :
• Children: Improves flexibility and concentration.
• Adults: Aids in stress reduction and physical fitness.
• Seniors: Improves mobility and can be adapted for relaxation.
Scientific research studies on benefts of Surya Namaskar have shown that regular practice:
• Boosts the body’s immunity.
• Reduces stress: Lowers cortisol levels and promotes relaxation.
• Improves metabolism: Aids weight management and digestion.
Here are some helpful tips to get the benefits of Surya Namaskar (Sun Salutations):
1. Start slowly
If you are new to Surya Namaskar, start with just a few rounds and gradually increase the number as your body gets more accustomed to it and helps in increasing strength and flexibility in the body.
2. Focus on the breath
Each movement in Surya Namaskar is synchronized with a breath – inhale on the upward movement and exhale on the downward movement. Proper breathing keeps the flow smooth and maximizes the benefits.
3. Warm up first
Surya Namaskar is a warm-up in itself, but doing some light stretches first helps loosen your muscles and reduces the risk of injury, especially if you are stiff.
4. Maintain alignment
Pay attention to your posture and alignment to avoid tension. Activate your core, relax your shoulders, and keep your spine long throughout the flow.
5. Move at your own pace
Don’t rush through the poses. Focus on maintaining smooth transitions and flow. As you build strength and flexibility, movement will come naturally.
6. Be consistent
Consistency is key to seeing progress. Try to practice daily, even if it’s just for 5-10 minutes. Over time, you’ll feel increased energy, flexibility, and mindfulness.
7. Set intentions
Before you begin, take a moment to set an intention or focus for your practice. This can be physical (strength, flexibility) or mental (calm, focus).
8. Use support if needed
If you’re struggling with flexibility or balance, don’t hesitate to use blocks or modify poses to suit your comfort level. It’s better to maintain form than to force the entire pose.
9. Listen to your body
Sun Salutations can be physically demanding. If you feel pain or discomfort in the body, stop practicing and change poses if needed and practice yoga according to your physical ability.
10. Finish with rest
After you’ve completed your rounds of Sun Salutations, take a few minutes to rest in shavasana (corpse pose). This allows the body to relax and receive the benefits of the practice.
These tips can help you get the most out of your Sun Salutation practice, whether you’re a beginner or an experienced practitioner.
How many rounds of Sun Salutations you should do per day depends on your fitness level, time availability, and goals. Here’s a general guide:
For beginners:
• Start with 4-6 rounds per day to build familiarity and stamina.
• Focus on getting the posture and breathing right.
For intermediate practitioners:
• 8-12 rounds per day is a good goal to improve strength, flexibility, and cardiovascular fitness.
• It takes about 15-20 minutes and provides a solid workout.
For advanced practitioners:
• 12-24 rounds per day can provide an intense workout, helping to build stamina, burn calories, and improve overall physical and mental health.
• Some people aim to do 108 rounds on special occasions like yoga festivals, but this is very challenging and should only be attempted after consistent practice.
Finally, listen to your body. Start with what feels comfortable to you and gradually increase it as you become more experienced. Consistency matters more than the number of rounds. Even doing a few rounds per day can yield significant benefits over time!
Conclusion
Surya Namaskar is much more than just a workout; it is a way to harmonize your body, mind, and spirit. By dedicating a few moments every day, you can feel a profound change in your overall health. So why wait? Step onto your mat and let the energy of the sun re-energise you.
FAQs
1. How many cycles of Surya Namaskar should I do per day?
It is ideal to start with 3-5 cycles initially. As your stamina improves, you can gradually increase the number.
2. Can Surya Namaskar help in weight loss?
Yes, it is a full-body workout that boosts metabolism and burns calories, thereby aiding in weight management.
3. Is it necessary to practice at sunrise?
Though sunrise is ideal because of the calm atmosphere and fresh air, you can practice at any time that suits you.
4. Do I need to be flexible to begin?
No, Surya Namaskar can be adapted to all flexibility levels. With consistent practice, your body will improve flexibility.
5. Can I practice Surya Namaskar during pregnancy?
It is advisable to consult a healthcare professional. Some asanas may need modification to suit your changing body.
Disclaimer
The information provided in this blog is not a substitute for treatment for any health problem. This blog does not guarantee that the information provided will cure any disease or serve as professional healthcare advice. We do not recommend using the information provided in this blog as a second opinion or specific treatment. If a person has any concerns about his/her health, he/she should immediately contact a professional doctor and seek treatment. Please do not disregard professional medical advice or delay seeking treatment based on the content of this blog.
Nice
It’s very nice and i have read and understand all about it and I promise to put that in work to keep myself healthy both physically and mentally
thanks dear
Nice
Nice
Very Helpful for everyone.
thanks sir
Wow that nice 👏 keep this up 😘😘😘
thanks dear